Sunday, March 11, 2012

Chevron accent wall


I had this crazy idea!  I have been thinking and planning for about a month now.  So, I finally did it! 

I painted a chevron wall in my office. 

First, I used a piece of graph paper to figure out what size I wanted the stripes.  I decided I wanted large 18 inch stripes.   Then I chose the color.   (peaceful grey by Behr) 

I did some research and saw a blog where the couple painted a chevron wall and used a chalk line.  They could not get the chalk line to fully go away after painting and cleaning though.   (I cannot remember where I found it so I can’t properly refer you to it, sorry)  I tried to find paintable chalk but could not find any.  So, I had to improvise. 

 My solution was to  make a string grid by putting lines of string up making 18 inch squares using thumb tacks and black string.  It would have been much easier with a chalk line, but since I didn’t want the mess, and ghost lines of chalk- this worked. 


Next, we taped from corner to corner to make the chevron.

* One thing to remember if you decide you want to do this is: think about your tape placement.  I used the existing wall color as my alternate stripe which means the stripe that I painted needed to be taped above the line, and the part that wasn’t painted the tape overlapped onto the unpainted stripe- I really don’t think that made sensebasically, if you want an 18” stripe you need to make sure your tape line is not in your area you would be painting.  If you notice, it looks like there are two sizes of stripes when it is taped off but once the tape is removed, you see it is 18 inches per stripe. 

I stopped at our local Sherwin Williams and got a whole bunch of information from them.  I learned a fantastic tip! Ready?  If you are painting and need a great line, splurge on the green frog tape.  It seems like regular tape but- the real tip is this: use a damp washcloth and wipe along all the tape.  The tape is made to expand and adhere to the wall when the paint hits it which keeps any paint from seeping through.  So,  if you wet it first, it works even better.   It worked perfectly for me!

Once painted, I removed the tape and marveled at our work.  (my husband helped)

Then I almost started to cry

I hate the color!  It is grey but it looks lavender in the sunlight.  I thought it was me.  Maybe it’s just me?!  Maybe it’s because I just didn’t love the color?!  So, I ask the first person to ring the doorbell.  The poor neighbor boy could sense he was in a rough situation.  I said: “What color does it look like to you?” He responded: “purple/lavender.”  I almost started to cry so he quickly says:: “You did a great job!”

Oh well, you live and learn. 

The biggest lesson I learned?  I will not use Behr paint ever again.  I have not had success in the past but the Home Depot paint guy was so sure I would love it.  I should have stuck with my gut on that one.   The paint was horrible.  THREE COATS and it was only covering a very light tan base color.  Unbelievable.  Not only that, it is not a smooth looking paint job.  Just my advice, so feel free to use Behr if you are brand loyal to them.  I just recommend using another brand.  

A second lesson:  do a test color!  Always!

It’s starting to grow on me so I’m not sure if I am going to repaint or not.  We shall see!


Dawn

Monday, March 5, 2012

Lucky


       I’m Lucky To Have You


I rarely decorate for St. Patrick’s Day.  I think about it but just don’t have much to put out.  I think some of the décor is just a little too- hmmmwhat word to use?  Ummmtoo metallic/crazy green? (A little Wizard of Oz Emerald City-ish???)  I just don’t want a whole lot of crazy going on on my counters and tables.  A little goes a long way in my humble opinion.  When I saw this cute green frame at Hobby Lobby the other day I thought it would be a perfect little splash of green on my desk and a little reminder to my hubby that he is appreciated.


The frame was already green so all I had to do was find a font I liked and print up the saying.  I put it in the frame and was done.  Just a quick, little project.  No painting or anything! 


You could easily make this for someone special and give as a gift. 

I have a lot of people ask me how to do ribbons like this.  It’s really super easy.  I just tie the main ribbon around the item, then, I find 3-6 different ribbons to stack.  I use the largest one as a base.  Cut to your desired length and trim the edges neatly.  Do the same with each ribbon getting slightly shorter as you go.  Cinch the ribbon in the middle and use the ribbon you tied around your gift to tie a knot around the cinched ribbon.  That’s it! I like to use wired ribbon for the large ribbons and some organza ribbon in the mix.  Glitter ribbon is the best! (I really like glitter- a lot)  I think it is hard to find good glitter ribbon that is pliable sometimes. 


Hope you have a “lucky day”!

Dawn


Sunday, March 4, 2012

Favors!


Party favors


The kids got their “swag” buckets after the party. They were very practical. {for a rock star} 


I got the purple buckets and silver shreds at the dollar store.  The zebra ribbon is from Hobby Lobby.


The contents were:

Popcorn

Grape Crush

Pen

Bubbles

Pop Rocks

Ring Pop


I put a tag explaining the contents of the buckets on the popcorn and tied it with a purple glittery tulle bow that also held the pen and bubbles.


Here is the tag I stuck to the popcorn.

Rock star survival kit.

Now that you are “soda” “pop”ular

And people “pop” up with a photo of you,

You will need an autograph pen,

and some glamorous, yummy jewelry. 

Don’t forget your Rock Star bubbles

for any special appearances!


Thank you for coming to my Rock Star

Party! Love, Olivia


The outer tag was tied on with a zebra ribbon.  I printed the tag on vellum paper and backed it with grey polk a dot cardstock.  The bucket was wrapped in cellophane.


Saturday, March 3, 2012

Seeing Stars!


Seeing Stars!!!
The party is over and the videos made.  It went great!


The party began with a whole lot of girls running wild getting their glow bracelets and necklaces on.  Once all the girls were here and the party started we divided up into 3 groups.  The girls went to stations to get make up, nails, and hair done.  Once they were glammed up, they put on a rock star jacket, glitter star sunglasses, and a pink feather boa.  They each picked a song to make a rock video to.  It was so stinkin cute.  They were adorable!

I was lucky enough to have A LOT of help.  My husband, sister, sister in law and friend saved the day! Thanks so much!!!

Decorations were pretty basic.  Of course we had the stage.  I also painted a table to match the stage to serve as a nail station.  I was concerned about having 5 and 6 year olds near nail polish so I decided to make a polish board.  More on that in a minute.


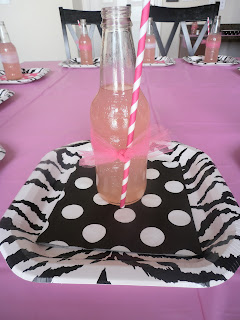
The table was set.  I used IBC cream soda bottles (we drank a lot of cream soda lately) filled with pink lemonade and tied with a tulle bow.  I inserted my favorite paper straws behind the bow and put them on the table. 


The nail polish board was just a board I had the Home Depot cut for me that I painted black.  I used my glue gun to put a bit of glue on the bottom of each polish bottle and stuck it to the board.  It worked perfectly.  The girls could see their choices and we did not have any spills!  Hooray!


All in all it was a successful party.  The girls had fun and that is what it is all about!

Friday, March 2, 2012

Rock Star Stage


Rock star stage

What was the curtain for?  As promised, here is the big reveal. 

 The Rock Star party is coming together.  I talked my husband into making me a stage for the kids to make music videos on and I painted it Rock Star pink.  I added some zebra stripes,  (using black acrylic paint) and there you have it! I’m getting so excited to see what these cute girls do when their inner rock star comes out and they make their music videos!  More pics and party info soon!

Dawn

Thursday, March 1, 2012


How to make a backdrop


I needed a backdrop with some color and that looked like a curtain. 


What to do?  I pulled out one of my “party tricks” and a glue gun and here it is!  A backdrop made with plastic tablecloths.  I have done this in the past for a few things and it is quick, easy, and colorful.  (and super cheap!)


(past parties I used tablecloths for decor)
Just buy as many tablecloths as you need (look at the measurements on the package and divide the smallest measurement by half because you will scrunch it on the tension rod. 

Which brings me to the next step.  I had to buy a tension rod because my other one is currently holding a million rolls of ribbon.  (They are really handy to have around) So either use a rod you already have or you can get one for really cheap at Walmart.


 Grab your handy glue gun and a couple of glue sticks and fold over one edge of the tablecloth.  Lift the edge  enough to spread glue under and press the fold down to create a rod pocket just like a curtain.  Make sure your glue gun is on LOW!  It is too hot for the plastic on high.  Watch your fingers too- I don’t want anyone getting burned.  It takes a couple of minutes to cool. 


Just place on the rod and there you have it.  A colorful backdrop.  Wonder what I’m using it for?  I will show you tomorrow.  It is pretty “wild”!


Dawn

Wednesday, February 29, 2012

Party like a ROCK STAR!


   Rock Star Party!

I've been busy  planning a Rock Star party for my soon to be 6 year old daughter.

I came up with a quick and easy invite I thought I would share.


First, I bought star shaped glitter sunglasses. They can be found here.


I had my daughter pose (like the Diva she is-yep, she picked that pose herself)

for some pictures with the star shaped glitter sunglasses on.


Then I used a photo editing program to type the party details on the photo.

I had them printed and placed them in a cellophane bag.

I also put a pair of sunglasses in each bag and folded and taped it closed.
I tied a zebra striped ribbon (found at Hobby Lobby) around the bag.


Voila! Done!

More details and pictures of the Rock Star Party to come...


Pin It on Pinterest

Follow me on Pinterest